A First Creative Fair Table That Feels Clear and Easy to Browse
A first creative fair table can feel considered without looking crowded: choose representative work, make browsing easy, and prepare a brief introduction.
How do you make a first creative fair table feel considered without turning it into a display that visitors are afraid to touch? A first creative fair table needs only a few representative pieces, a clear way to browse them, and a short explanation you can say comfortably. The aim is not to show everything you have made. It is to help someone understand what is here and decide where to look next.
Which pieces should you bring to a first creative fair table?
Choose a small group that makes the character of your work legible at a glance. A useful selection often includes one piece that catches the eye from a few steps away, a few examples that show the range of the work, and an accessible item a visitor can pick up or examine closely. The pieces should feel related, but they do not all need to be variations of one design.
Begin by laying possible items together at home. Notice what they have in common: material, subject, color, process, or a particular way of using them. Then set aside pieces that introduce a different idea without helping a visitor understand the main one. That does not make those pieces unworthy; it means the table has a limited job.
Think about what a stranger can tell from each item without a long explanation. A ceramic cup may show a glaze and shape clearly; a small print may reveal a recurring drawing style; a stitched pouch may make its construction and use easy to grasp. Include one less-obvious piece if it gives you a natural reason to talk, but do not let the whole display depend on verbal explanation.
Consider handling, too. If an object is fragile, heavy, or easy to damage, decide whether it should be displayed for looking rather than browsing. For a delicate paper piece, you might show one copy in a protective sleeve and keep other copies behind the table. A clear boundary helps visitors explore without guessing what is safe to touch.
How much variety makes a table feel coherent?
Enough variety gives visitors a reason to pause; too much can make the table read like several unrelated projects. Keep one visible thread through the selection, such as a recurring material or subject, and use differences in scale or color to make individual pieces distinct. If a visitor can describe the group in a few plain words, the selection is probably doing its work.
That thread does not need to become a slogan or a grand story. It can simply be “hand-printed botanical cards and small paper goods” or “useful objects made from reclaimed fabric.” These descriptions identify what is present. They also help you decide whether a candidate piece belongs on the table or would be better saved for another occasion.
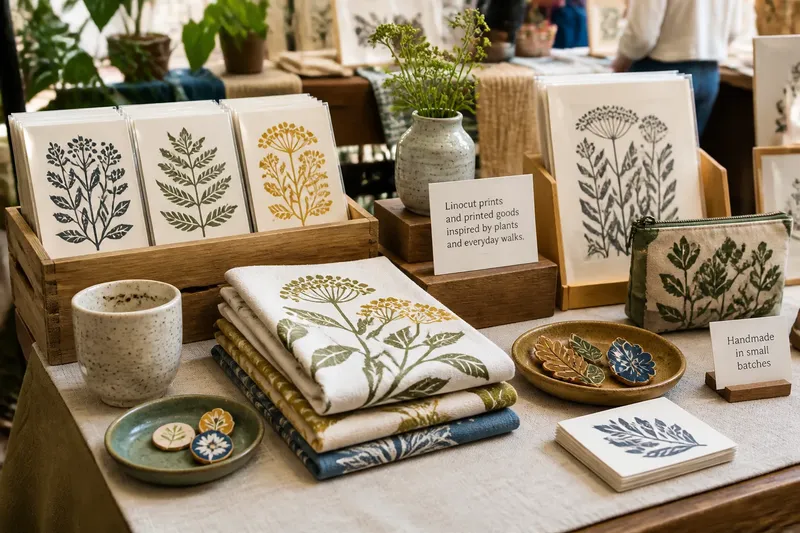
Imagine you make screen-printed tea towels, greeting cards, and a single run of painted wooden brooches. If the fair table is meant to introduce the print work, you might bring a few towel designs, a couple of cards using related motifs, and one brooch as a small contrast. Visitors could see the shared imagery, compare uses, and pick up a card without facing three equally large collections.
Do not spend hours trying to make every item match a perfect color scheme. A little visual variation feels natural, and visitors are not conducting a design audit. More useful is removing anything that blocks a clear view of the work or makes the table’s subject harder to read.
How can visitors browse without feeling unsure?
Make the first choice obvious. Place a recognizable or visually distinctive piece where it can be seen from the aisle, then arrange related pieces in small groups. Leave enough room for a hand to reach an item without nudging its neighbors. A table that invites browsing feels different from one where every object is arranged at the edge like a museum case.
Use height sparingly. A shallow wooden crate, a sturdy book stand, or a low riser can bring a few pieces into view, while the rest remain on the tabletop. Keep taller objects toward the back so they do not screen smaller work. If the fair supplies a narrow table, prioritize an open surface over elaborate levels; visitors need room to set down a bag or examine a piece.
Labels can answer questions before you are asked. Add a simple card with the maker or studio name and a short description of the work. Where relevant, identify materials or explain whether an item is a print, original, or handmade object. Use readable lettering and plain language. A visitor should not have to decipher a poetic phrase to learn what the piece is.
Decide where prices and payment information will be visible, and keep the arrangement easy to maintain. A small price card beside a group can be clearer than tiny tags attached to every object. If items differ in price, label them individually or group them so the distinction is unmistakable. For payment options, follow the fair’s arrangements and the instructions of your payment provider.
Keep personal essentials out of the browsing area. A tote, water bottle, packaging, and spare stock can make an otherwise thoughtful display feel crowded if they spread across the table. Tuck them beneath or behind it when the venue allows. What is not worth the effort: building a complicated backdrop that needs constant adjustment or makes the work harder to see.
What should you say when someone asks about the work?
Prepare a brief explanation that names what you make and gives one detail a visitor can respond to. For instance: “I make small linocut prints of plants I see on neighborhood walks; this one uses a leaf shape I kept sketching.” It is specific enough to open a conversation, but short enough to leave room for the other person’s interest.
Try saying your explanation aloud before the fair. If it sounds like a pitch, remove claims about how special or unique the work is and replace them with something observable: the material, the process, the subject, or the intended use. If it takes several sentences to reach the point, start with the clearest one and keep the rest for follow-up questions.
After greeting someone, give them a moment to look. A quiet “Feel free to pick anything up” can help if the pieces are suitable to handle. If someone asks a question, answer it directly, then let the conversation breathe. You do not need to narrate every object or turn a pause into a sales pitch.
If a piece has a practical detail worth mentioning, make that detail easy to say. You might note that a print comes in a protective sleeve, or that a pouch has a lined interior. Stay accurate about materials and care. Where the right answer depends on a product label, maker instructions, or local rules, defer to those rather than improvising.
What do first-time fair visitors often want to know?
How many pieces should I put on the table?
Bring enough to show the family of work you want people to recognize, but not so much that one piece hides another. A compact selection is easier to browse and easier to replenish as items move.
Should every item have a label?
Label groups clearly, and label individual pieces when their price, material, or identity could otherwise be confused. Keep the wording short and place cards where visitors can read them without moving the work.
What should I do if the table is smaller than expected?
Prioritize the clearest representative pieces and remove display extras before squeezing everything together. Keep a small reserve of additional stock out of sight if the venue permits, and bring pieces forward only when there is room.
How do I explain handmade work without sounding rehearsed?
Use one natural sentence about what you make and one concrete detail about a piece. Practicing the idea helps you find the words, but you can vary them in conversation rather than reciting a fixed script.
How can I prepare the table without overplanning?
Do a simple rehearsal on a clear surface at home. Arrange the selected work, add the labels and display supports you plan to bring, then step back and look from the height and angle a visitor might have. Move anything that blocks a label, crowds a group, or makes the first item difficult to approach. This is a visual check, not a demand for a perfect mock-up.
Pack the display as a working set rather than a collection of loose hopes. Keep labels with the pieces they describe, put small supports together, and bring a basic way to secure paper items if the venue is breezy. Make a short packing note based on what your own setup needs: work, display materials, labels, packaging, payment method, and personal essentials. Avoid adding equipment simply because a polished booth online used it.
On arrival, check the table surface and the space around it before arranging anything. Venue layouts vary, so let the actual conditions guide the setup. If your display depends on a wall or a power source that is not available, simplify rather than trying to improvise something unstable or intrusive. Follow the organizer’s directions for the space and its permitted fixtures.
Once the display is in place, stand back and ask three practical questions: Can someone tell what I make? Can they reach a piece without disrupting the rest? Can they find the information they need? Fix the clearest obstacle, then stop rearranging. A table should be ready for conversation, not frozen into a composition that you feel compelled to protect.
What should I notice while the fair is underway?
Pay attention to where visitors pause, what they pick up, and which questions recur. These are useful observations about the display’s clarity, not a verdict on the value of the work. If people repeatedly ask what a material is, a brief label may help. If a popular piece is hidden behind a taller one, move it forward. Make small changes when the table is quiet rather than rebuilding it in the middle of a conversation.
Notice what you find easy to explain, too. A question that leads naturally to a short, satisfying answer can reveal which details are most useful to share. If a visitor seems interested in a particular process, you can offer that detail without expecting every person to want the same conversation.
Keep your brief explanation connected to the objects in front of you. A creative fair is a meeting between a person and a piece of work; the table’s job is to make that meeting approachable. Choose pieces with a clear relationship, leave space for browsing, and speak plainly when someone asks. For a first creative fair table, that is a thoughtful preparation plan, not a small version of a shop that needs to be built all at once.